3D Modeling - Mojo Jojo

I teach a semester-long 3D Modeling course to my advanced high school students.  For their project, they are asked to make a hat for a monkey.  There is a monkey mesh built-in to Blender, so it's a great place to start.  All they have to do is add the monkey to their workspace, and then use shapes to construct a hat for the monkey.  It's a great way to get them comfortable with the 3D workspace and it teaches them how to move, rotate, and resize their meshes.

For more advanced students, I show them how to add materials and textures and invite them to put their own spin on the project.  Recently, a student turned in a monkey that she had made into Mojo Jojo from Powerpuff girls.  I think this is my favorite monkey project yet!  Instead of making a hat, she made a Mojo Jojo mask for her monkey.  I love it so much!


ThisIsSand

I recently discovered a really cool program/app that called Thisissand. It allows you to make sand art on your computer, smart phone, or tablet.  It's really addictive and the falling sand sound effect is really soothing.  So far, I've only used it as a "brain break" activity, however, I think there a lot of ways it could be used for a more detailed art project.  I am thinking it could be a good way to introduce color theory or even abstraction.  Or, you could combine it with an actual hands-on sand art project to extend it further.


Have you used this before?  Or if not, how would you use it in your classroom?


3D Printing in the Art Room

I was lucky enough to win a 3D printing competition, sponsored by MakerBot and Thingiverse, for my school.  This was a huge deal, because one of my goals for our arts program was to get a 3D printer, but it was not within the school's budget.  Over the next few posts, I am going to share with you the various ways that I have been able to incorporate 3D printing into our Art program.

Our MakerBot in action
3D printing is an amazing technology, and it teaches so much to the students!  It teaches them to be thinkers and designers, and there is a great deal of problem-solving and revision that goes into play.  I know some schools use 3D printers are part of their technology department, but I think that it is a fantastic tool to be used in the art room as part of an integrated arts curriculum.   Over the next few posts, I will show the different projects I designed, specifically:

  • --Geometry Robots with TinkerCad (K-5)
  • --Figurine Design with TinkerCad (6-8)
  • --Jewelry Design with TinkerCad (9-12)
  • --3D Modeling with Blender (9-12)
  • --3D Printing "Mini Museum" for Art History (9-12)
Student projects on display at the Georgia Educational Technology Conference
I will continue to update the blog with student projects as we complete them.  Feel free to contact me with questions!  I would also love to hear how you incorporate 3D printing into your arts curriculum.


3D Modeling with 5th Graders: Geometry Robots


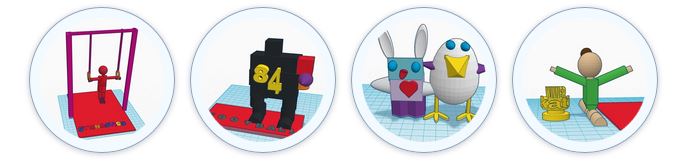
I worked with teachers at a local elementary school to help implement 3D printing into their Art curriculum.  We worked with four 5th grade classes on this "Geometry Robots" project.  The Art teacher introduced the project in Art class and students sketched plans for constructing a robot out of geometric shapes.  Students were tasked to think about the logistics of construction in 3D.

I then visited the students in their Technology class and taught them how to use the program TinkerCad.  Using their sketches as a guide, they build their robots from geometric shapes and other components.  Students learned how to move, rotate, resize, and combine their shapes.  They were encouraged to use the shapes creatively in their designs.  Students worked on these projects over two class periods in the computer lab.

Once student projects were complete, I worked with the teachers to show them how to print the files on their 3D printer.  However, this project could easily be implement in a school that does not have a 3D printer by simply skipping this step. The teacher can even take screen shots of all the students designs and print them as photos for display in the school.

For the culmination of this project, the Art teacher worked with the students to construct recycled material sculptures based on their robots.  Students can compare and contrast the initial sketch, 3D print, and sculpture.


...

3D Modeling - Monkey Project


In the beginning of my 3D Modeling class, students use Blender to make monkeys. For their project, they are asked to make a hat for a monkey.  There is a monkey mesh built-in to Blender, so it's a great place to start.  All they have to do is add the monkey to their work space, and then use shapes to construct a hat for the monkey.  It's a great way to get them comfortable with the 3D work space and it teaches them how to move, rotate, and resize their meshes.

For more advanced students, I show them how to add materials and textures and invite them to put their own spin on the project.  It's a great place to start because it's very scale-able to individual student abilities.  I have some students that do not have a great handle on the technology, and so they will really struggle with just the basic task of making the hat.  For students with prior experience working in 3D, I show them how to break apart their mesh so that they can apply different materials and textures to the parts.  With the standard monkey mesh in Blender, if you apply a texture to the monkey, it will apply it to the entire shape because it is one solid shape.  Students can learn how to use the separate command to break their monkey apart so that they can give different colors to the eyes, nose, etc.  The above image shows an example of this.

Later, students will work to create a body for their monkey head.

Below are some examples from this project.


...

Double Exposure

This Double Exposure project is one that I like to give students early in the semester because it really gets them hooked on Digital Photography.  Even for the ones that are struggling, the results are very satisfying and it gives them the confidence to delve deeper into the possibilities of photo manipulation.

I've put together a short video demos on how to do this in both GIMP and SumoPaint.  It can also be easily done in PhotoShop, but we stick with free software at my school due to a small budget.

Student project examples:


See more examples of student work from the Double Exposure project here. 

Grant Writing for Art Teachers

Is your school under-funded?  Do you have an idea for a project but don't have the budget to accomplish it?  If so, there are a number of grants available that may help you reach your goals.  Currently I am batting about 50% success rate with my grant applications, which I feel pretty good about.  Granted, as I complete more that average will probably go down, but it's still a worthwhile endeavor to help augment your teaching.  Here are some tips to help you if you are new to the process:

Start with a plan.  Start by thinking about what you want a grant for.  This will make it easier for you to narrow down the ones you want to apply for.  As great as grants are, the application process can be very time consuming, so investing hours and hours applying for a travel grant when you hate to travel probably isn't the best use of your time.  Do you want to participate in a professional development opportunity?  Do you need new equipment for your Art room?  Do you want to take your class on a great field trip?  Once you have some ideas, that will give you a good place to start.

Take your time searching.  I've found it helps bookmarking any that sound like they could be good, and then narrowing the list down.  Pay careful attention to the deadlines, and prioritize any that are due soon.

Write carefully. Once you've found a grant that you really want and that you feel is a good fit, get started writing.  Pay careful attention to what they are asking for in the proposal.  Review committees are looking to select a person and a project that is a good fit with their objectives.  It's just like I tell my students- if I ask for an essay on Stonehenge, and you turn in an essay on the Mona Lisa, I don't care how good it is, you're not going to get credit.  Read the instructions very carefully and make sure your proposal is well-written and on point.

Find a grant buddy.  This may be another teacher who will help search for grants with you and send you any good ones they find.  Or this can be a good friend, your spouse, or anyone that is supportive and willing to read your writing.  You will have spent so long working on it that the words will start to bleed together.  Get someone to read it for you and give you feedback and suggestions.

Choose your reference(s) carefully.  Many grants ask for a reference letter from an administrator.  If you have more than one administrator or supervisor, choose carefully.  You will want to pick someone that is a strong supporter of you and your work, is reliable, and has good writing skills. 

Take it one (or two) at a time.  Don't overwhelm yourself trying to apply for 15 grants in a single year.  Sure, they all sound great, and wouldn't it be great to have all that money!? But.... you can only do so much. I was recently reminded of this when I read the great post by Artful Artsy Amy about time management for teachers.  I had a running list of 5 different grant projects I was working on, and this really made me re-evaluate what I was doing.  I came to realize that I wasn't as invested in some as in others, and I was able to narrow the list down to 2-3 that I am most interested in.

Don't get discouraged.  There are a lot of teachers applying for a small number of grants.  And it seems like only a small number of grants apply to Art teachers.  So there's a good chance you won't get the grant you applied for, but that's ok.  You will try again and get better and get smarter and eventually you will get one and it will be so exciting.  It's like I tell my son about basketball-- if you don't shoot the ball, you have a 0% chance of scoring.  So don't be afraid to shoot the ball!

Upcoming grant opportunities for Art teachers: